
Thursday, 9 April 2015
Monday, 30 March 2015
Tuesday, 13 January 2015
Editing my film opening
While I had been filming the horror clips for my opening I had been editing the shots at school so I could get a rough idea of what shots I still needed to get and what I already had. Now that all my filming is done, I took some time to sit down and perfect my film opening. During class before the christmas holidays we showed what we had created so far, I received some positive feedback that I really wanted to consider. One of my classmates commented on the ending and mentioned how it was more like a mystery than a horror opening. So this week I took some time looking at the ending and already made horror film openings. My teacher had given me the idea to add in some police radio background noise that shows that it's a murder investigation. This idea worked really well and so I decided to keep that in the opening, however I still felt as though the horror opening still needed something on top of the radio noise. So I went into garage band to have a little experiment with the provided instruments and found a synthesised noise called "Sea Glass" with this I was able to create some interesting chords which I held out for a few seconds that sounded really creepy and eery. Then I put these noises into my horror opening and found the sounds were just perfect.
This is a screen shot of the editing process in final cut pro, as you can see this is the crime scene towards the end of the opening. Since the lighting was fairly dark when I filmed this, I used the exposure settings to brighten the clips so that the police tape was clearer and easier to see.


Thursday, 18 December 2014
FINAL DAY OF FILMING!!!

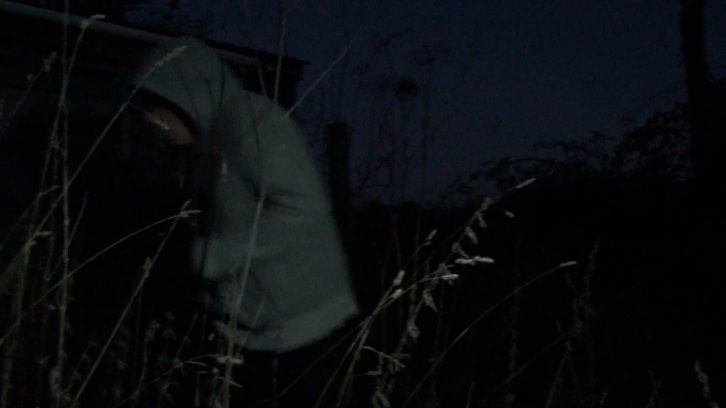
 I am so pleased to say that I have officially finished the filming process in my project. I was able to drive up to the abandoned farm and shoot the last scene of my horror film opening. unfortunately when we got there it was getting dark so we were in a hurry to get the filming done, but with the help of final cut pro I was able to increase the exposure which brightened the shot so it wasn't so dark. This is because I wanted this scene to be lighter than those before the title. This would show that the crime scene was the start of a new day and not part of the two girls playing hide and seek. I got some police tape from the school as they had some from previous years and hung it up around the farm and filmed it blowing in the wind which really helped to build up the suspense which is exactly what I wanted and i'm really glad it was that windy so I was able to film those scenes because they are just so effective. After making my fake blood I was also able to splatter it onto a pair of old ripped jeans to use as evidence. Making sure the main character was wearing exactly the same as the last to filming days I took the scarf she wore and placed it into the crime scene so that it was obvious that something had happened and that she had gone missing. The scarf was really effective as it too hung on branches and swayed in the wind really helping to build up the suspense. I also filmed some shots of the victim, but because of the lighting you weren't able to see her very well and when it came to editing I didn't find the shots very effective at all, as it made it look like the victim was still alive even though she was meant to have been killed by a murderer. I filmed one scene of katie lying in the grass so you could just see her legs sticking out which really signified that she was intact dead. However now that I've come to editing I feel as though the end of the film opening doesn't quite look right. After having received some comments from class mates I was told that my film resembles a mystery film rather than a horror. I may need to film some more shots or I made need to change the order of the shots, but I'm putting some thought into what I'm doing and am asking around for other's opinions to see what I can do to make my horror opening complete. Below is the shot of the legs sticking out of the tall grass with the 'prism' effect on, it looks very scary and intruiging.
When it came to editing I decided I would put on an effect of the 'prism' to help add more suspense, This is a screenshot from final cut pro, with it zoomed onto the filter options and a brief description.

The following table is my filming timetable that I handed out to all those involved with the filming process that made it clear to them when we were meeting, where and what to bring or wear. It was really helpful and made the filming process a lot more organised and simple.
| Day/Time | Who | Where | What | Costume | Props | Equipment |
| 16th Nov,14 16:00 |
Katie, Amelie, Oliver, Jeremy, Gerard, Myself |
At the Weston Woods entrance | We're going to be filming a few short scenes of Amelie and Katie running through the woods | Amelie: Pink Coat, Leggings, Boots, Pink top Katie: Boots, Scarf, Coat, Jeans, Hoodie |
None. | Sony Video Camera Boom Mic Boom Cord Umbrellas 3 Torches |
| 7th Dec,14 | Gerard, Katie, Myself |
Abandoned farm behind Weston Hills | We're going to be filiming Katie hiding being scared and Gerard running through the farm looking for her | Katie: SAME EXACT OUTFIT AS LAST FILMING Gerard: A dark hoodie, Dark black jeans |
None. | Sony Video Camera Boom Mic Boom Cord Umbrellas 3 Torches |
| 17 Dec,14 | Becky, Katie, Myself |
Abandoned Farm behind Weston Hills | Filming the crime scene with blood and police tape and Katie dead on the floor | Katie: SAME EXACT COSTUME AS THE PREVIOUS FILMING DAYS | Police Tape Fake Blood Katies Scarf |
Sony Video Camera Boom Mic Boom Cord Umbrellas 3 Torches |
Second Day of Filming!
On Sunday the 7th I was able to head up to the woods again to film the rest of my nighttime scenes. This time instead of just going to the woods, I went to the abandoned farm that I had been so keen to film in. When we got there it was still a lot lighter than we needed it to be seeing as the scenes that we were shooting were going to be edited in after the scenes from the first day of shooting and to have it lighter than that just wouldn't make any logical sense. So we made sure that we didn't get the skyline in the frame. My camera man (Gerard Staines) was able to position the camera so that the light skyline didn't show in the frame making it look just as dark as when we filmed in the woods.
We began by filming shots of the main character (katie) running in, through and around the farm looking for hiding places. Eventually it was dark enough to film an establishing shot of the farm which was on my to do list after the last day of filming which I was pleased with.
 I was also able to get some shots of the villain snooping around the woods looking menacing and trying not to make a noise that might scare Katie. At one point the freezing cold got to my sister which set the filming process back by quite a bit and she was refusing to be filmed which caused a lot of problems as she is my main and most important character and so without her the film simply wouldn't work. I was able to negotiate with her and the filming carried on smoothly without any more problems. I even accidentally caught some footage of my sister crying on camera which she has given me permission to use which I think will look really good and effective to her being lost in the woods which is exactly what I want.
I was planning on having footage of the villain and main character in the same shot together but instead I had the idea of filming the long grass blowing in the wind to which I will add the voice over of the villain attacking the main character with screaming. With the right editing and filter, I believe this shot will look really scary and will help to build the tension in the film opening.
My next day of filming will hopefully be my last, I'm going to be filming the crime scene investigation in the day time. I have the police tape and all I need is the fake blood which I am going to make and post a tutorial on how to make it soon. My goal is to have filmed this scene before the weekend so I can begin editing it as soon as possible and be able to meet the deadline.
 I also managed to get some shots of the woods in the dark and by using the torch and shining it through the woods I was able to take some really spooky shots of the the twigs and branches moving in the wind. I've made it like a point of view shot from the main character's perspective as she's looking for a place to hide. The camera pans across the woods quite quickly as well which looks really good and helps to build up the tension with the dark atmospheric woods.
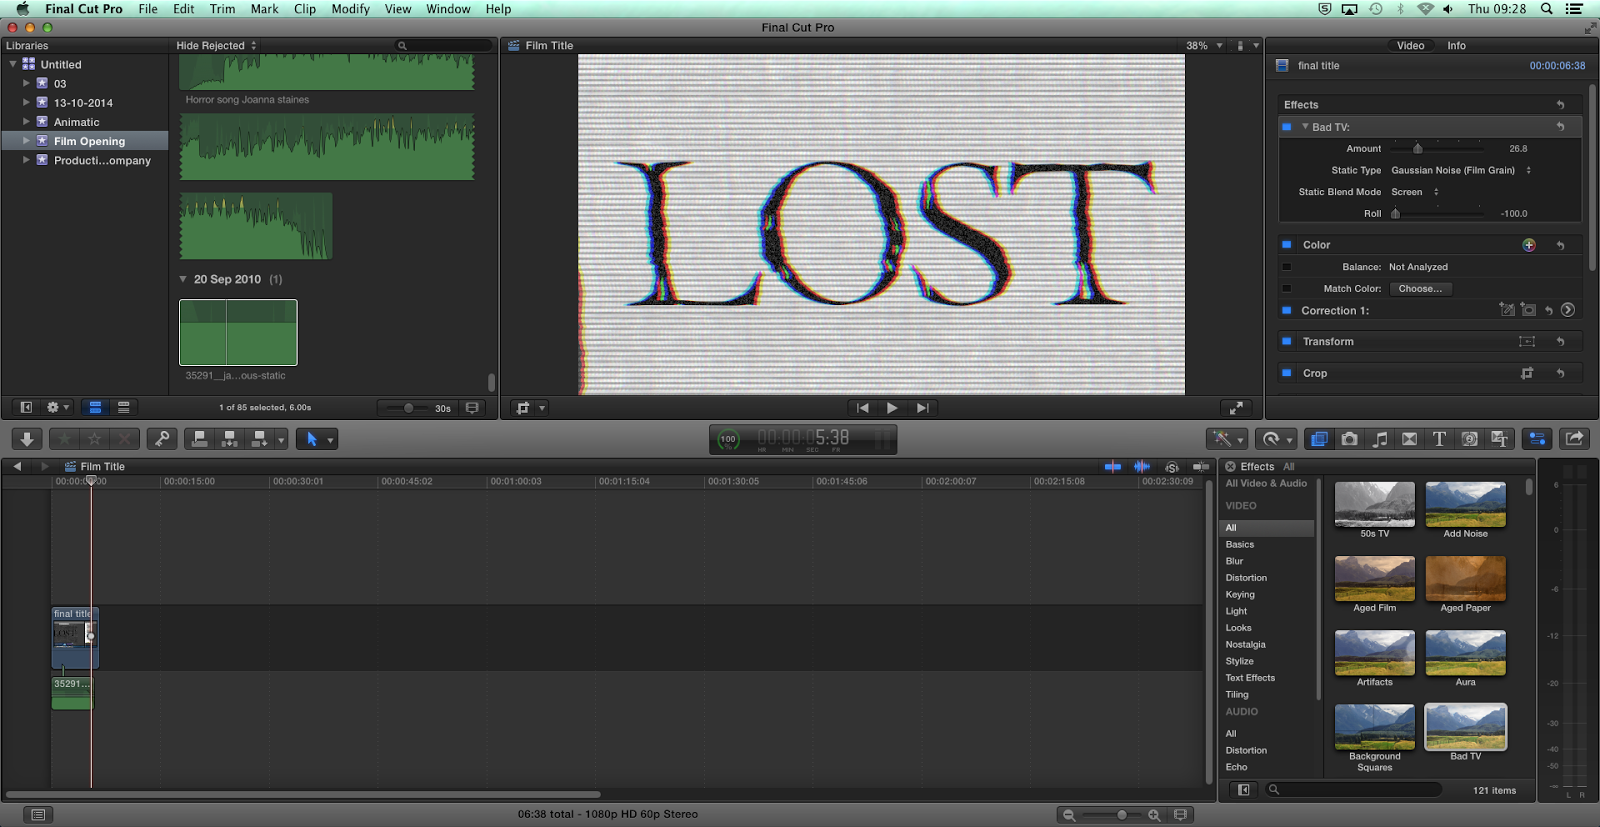 When editing these shots into my film opening I also managed to add in the title which I'm very please with as it is very jumpy and loud and you don't know when it's going to come up in the film which I find very effective. I've used the same 'Bad TV effect' as I did in in my film institution 'Twisted Productions' and along with some very loud static noise, I've managed to create the perfect jumpy film title. This is really effective as all the scenes before it really build up the suspense and brings the audience into the film when suddenly the title pops up and scares them all which I find to be exactly what I want in my film opening!
My goal is to be finished filming by the end of this week. I planned on filming the last of my footage on Friday the 12th which I managed and now all I have to do is finish editing.
Making fake blood
In my film, I am 100% certain that I will include fake blood, not only on my victim but also at the crime scene on pieces of ripped clothing that the victim was wearing. I researched different types of fake blood and here is my short tutorial on how to make it! This recipe didn't work as well as I hoped as in the fake blood you could see lumps of food colouring and flour so if I make it again I will find a different recipe or I'll mix it in a lot better than I did here. However, when the blood was put on the ripped jeans the lumps were no longer visible and the blood darkened which is exactly what I wanted it to do. So it was really effective and I'm very glad with the outcome.
Tuesday, 9 December 2014
Animatic
Subscribe to:
Comments (Atom)